OpenWeather and IoT Open
Author: Marcus Rejås, IoT Open User and IoT Open Employee
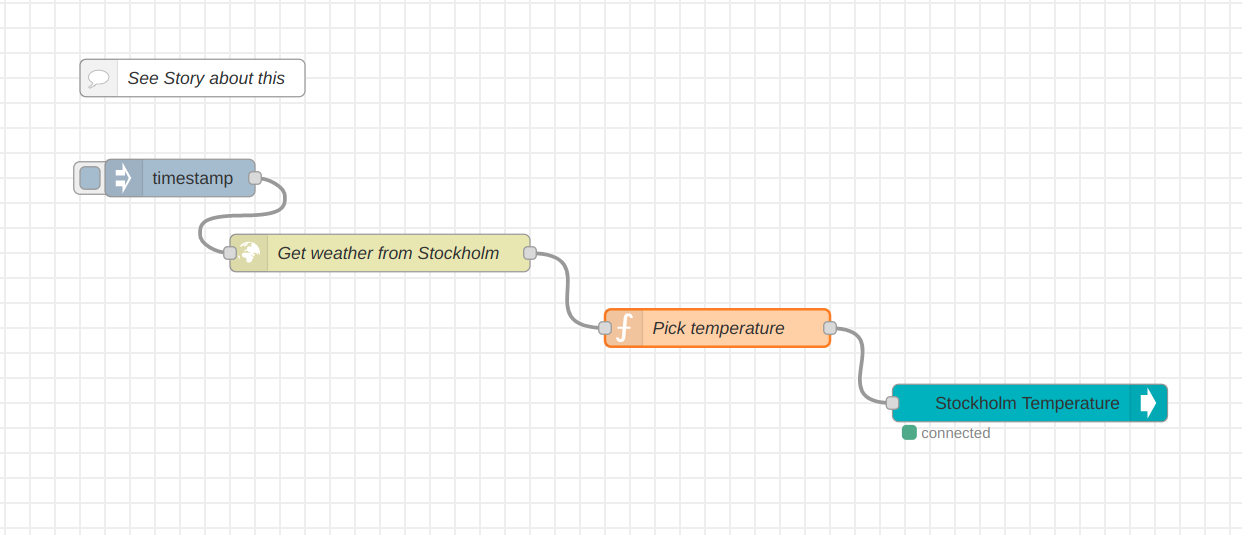
New updated version 21/12 2021. Now I'm using the much easier lynx - out node in Node-RED.
Background
I use OpenWeather to get the current weather into my IoT Open Lynx installation. By doing that I easily get updated weather data from near my home without having to install my own sensor.
There are of course many ways to do this, here I show how I did it with Node-RED. You can also apply this guide to other weather services that have similar APIs.
Prerequisites
In order to use the free data from Open Weather you need to get an API Key from their site. You also need an API Key to Lynx in order to inject the data to Lynx. Finally, you need an installation of Node-RED that can be hosted anywhere. Even on you own computer works, but then of course you will only get the data to Lynx when it is running.
In Node-RED you also need the IoT Open Nodes. Open the palette and install the @iotopen/node-red-contrib-lynx Nodes. You can read more about this here.
To get the API Key from Open Weather follow these instructions. In this guide I use "API_KEY_OPENWEATHER" as key, replace with your key.
To get a Key from Lynx, follow this guide. In this story I use "API_KEY_LYNX" as key, replace with your key.
Steps
These are the steps we need to accomplish.
- Get the data from Open Weather
- Create a function in Lynx for the data
- Inject the data to Lynx using Lynx-out node
Get the data from Open Weather
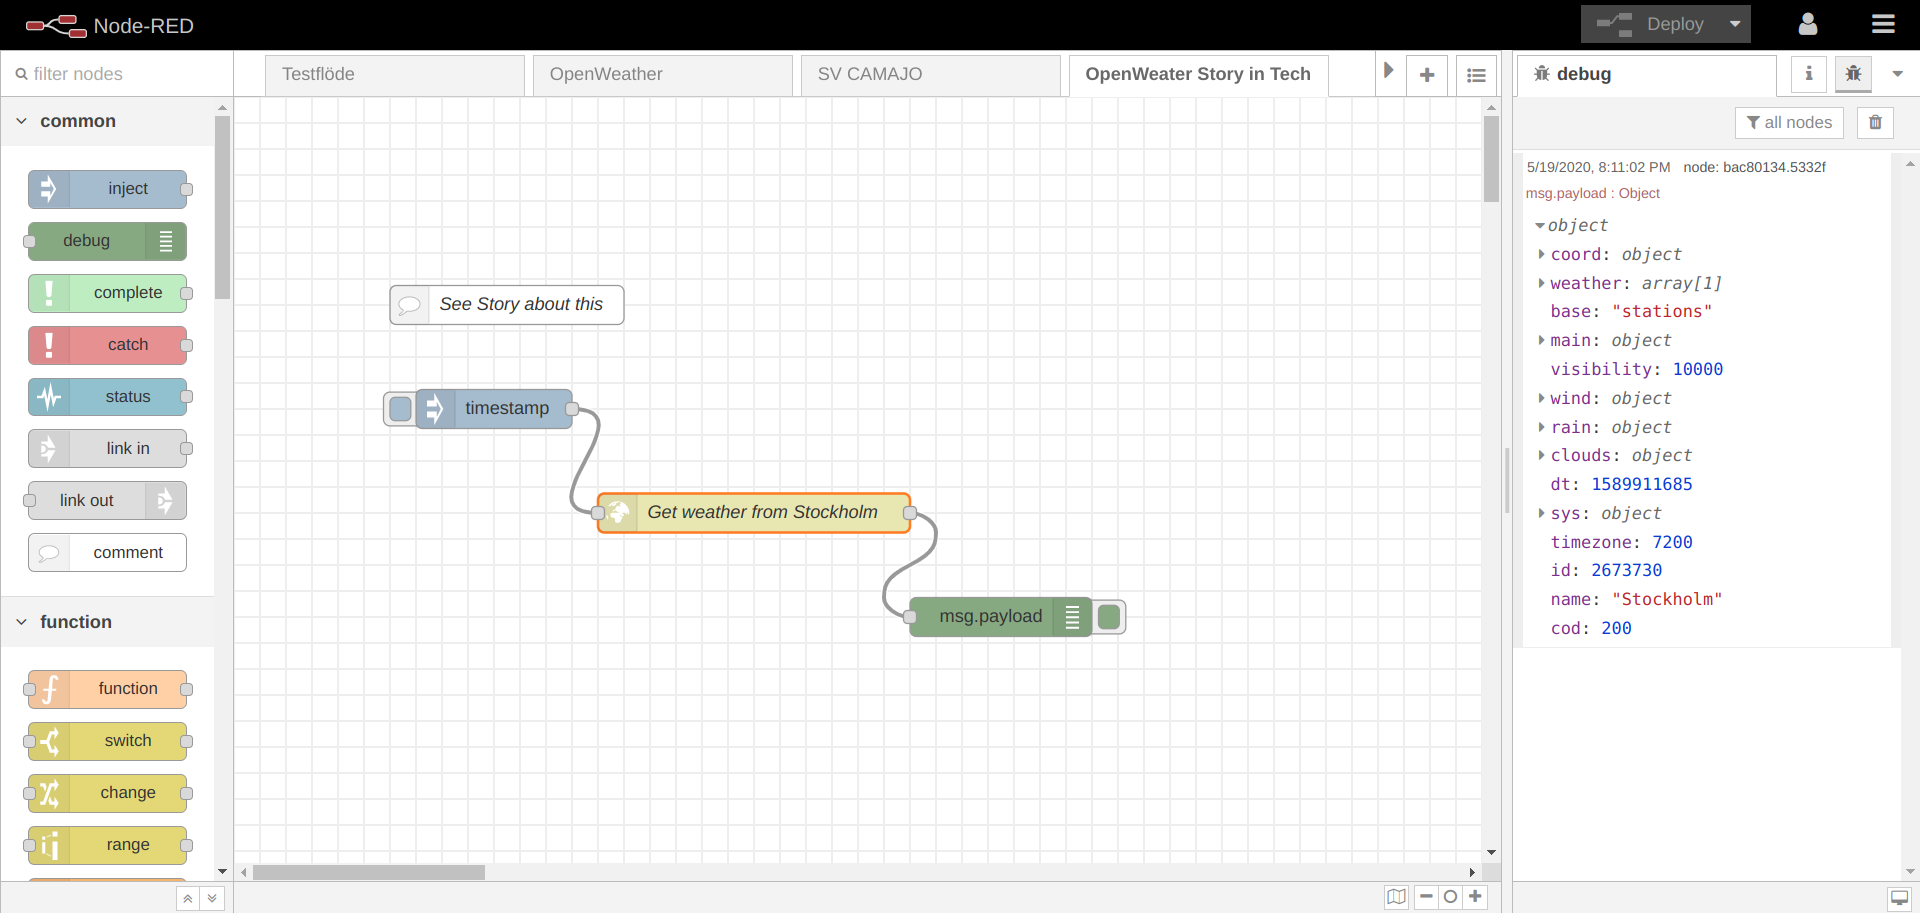
To get data from Open Weather we use the http request node to call the Open Weather API. To get started we connect it to an inject-node and to see the result we connect it to a debug-node. The flow as of now looks like this.
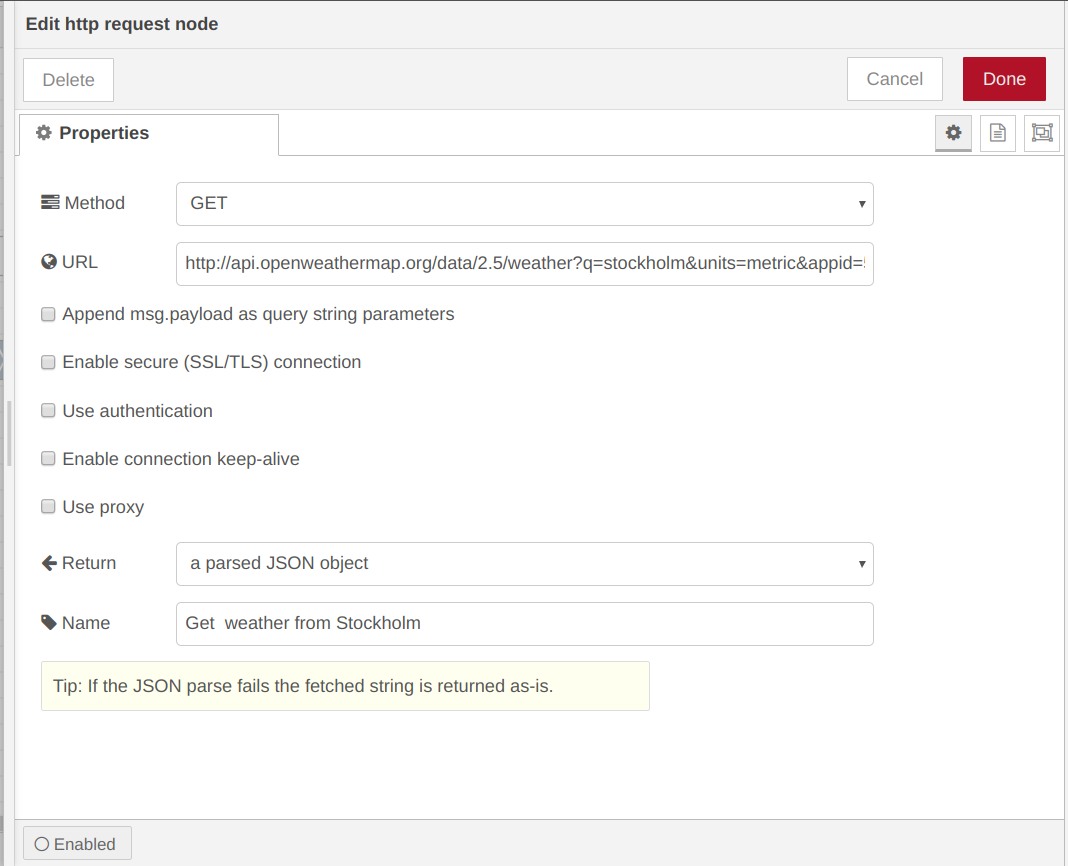
We get the data from this url (remember to add your API Key):
http://api.openweathermap.org/data/2.5/weather?q=stockholm&units=metric&appid=API_KEY_OPENWEATHER
So, the http request node will look like this.
There are other ways to get the weather but that is not in the scope of this story.
Take some time to study the data you get from Open Weather whenever you press the 'Inject' node:
{
  "coord": {
    "lon": 18.06,
    "lat": 59.33
  },
  "weather": [
    {
      "id": 500,
      "main": "Rain",
      "description": "light rain",
      "icon": "10d"
    }
  ],
  "base": "stations",
  "main": {
    "temp": 8.58,
    "feels_like": 5.33,
    "temp_min": 7.78,
    "temp_max": 9,
    "pressure": 1015,
    "humidity": 70
  },
  "visibility": 10000,
  "wind": {
    "speed": 2.6,
    "deg": 70
  },
  "rain": {
    "1h": 0.12
  },
  "clouds": {
    "all": 70
  },
  "dt": 1589911685,
  "sys": {
    "type": 1,
    "id": 1788,
    "country": "SE",
    "sunrise": 1589853928,
    "sunset": 1589916198
  },
  "timezone": 7200,
  "id": 2673730,
  "name": "Stockholm",
  "cod": 200
}
We will only use the temperature for now, but as you can see there are more possibilities left for you to explore.
Pick just the temperature
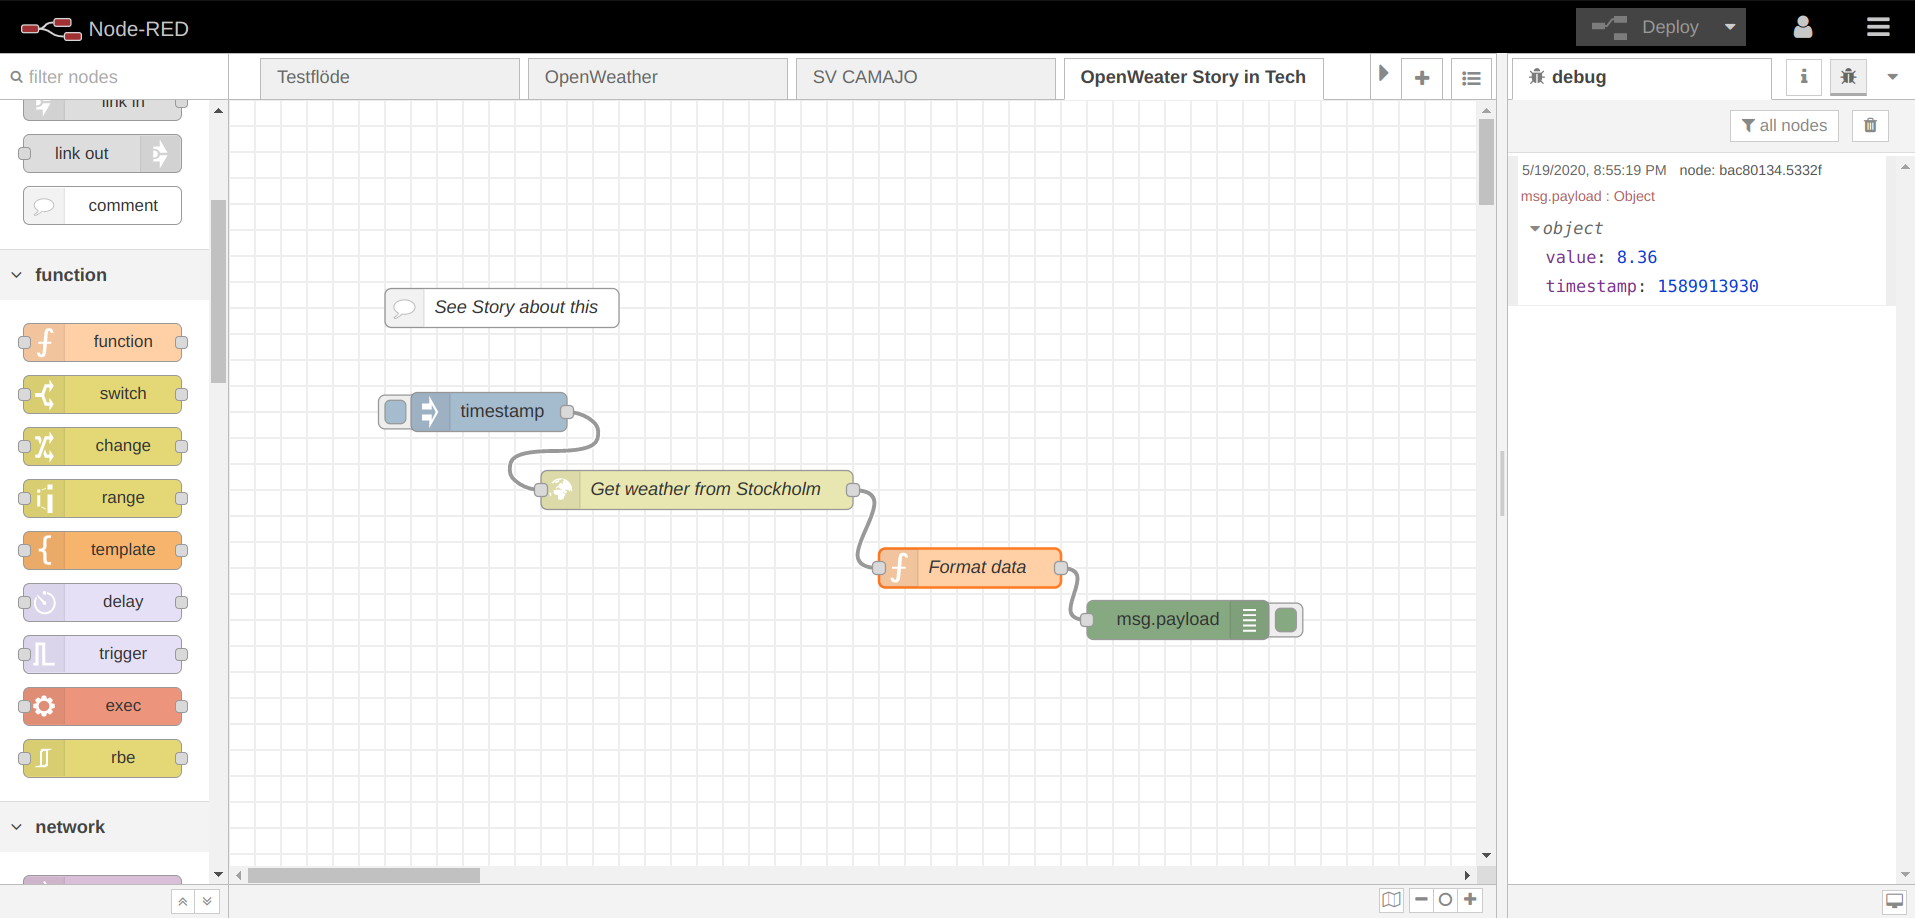
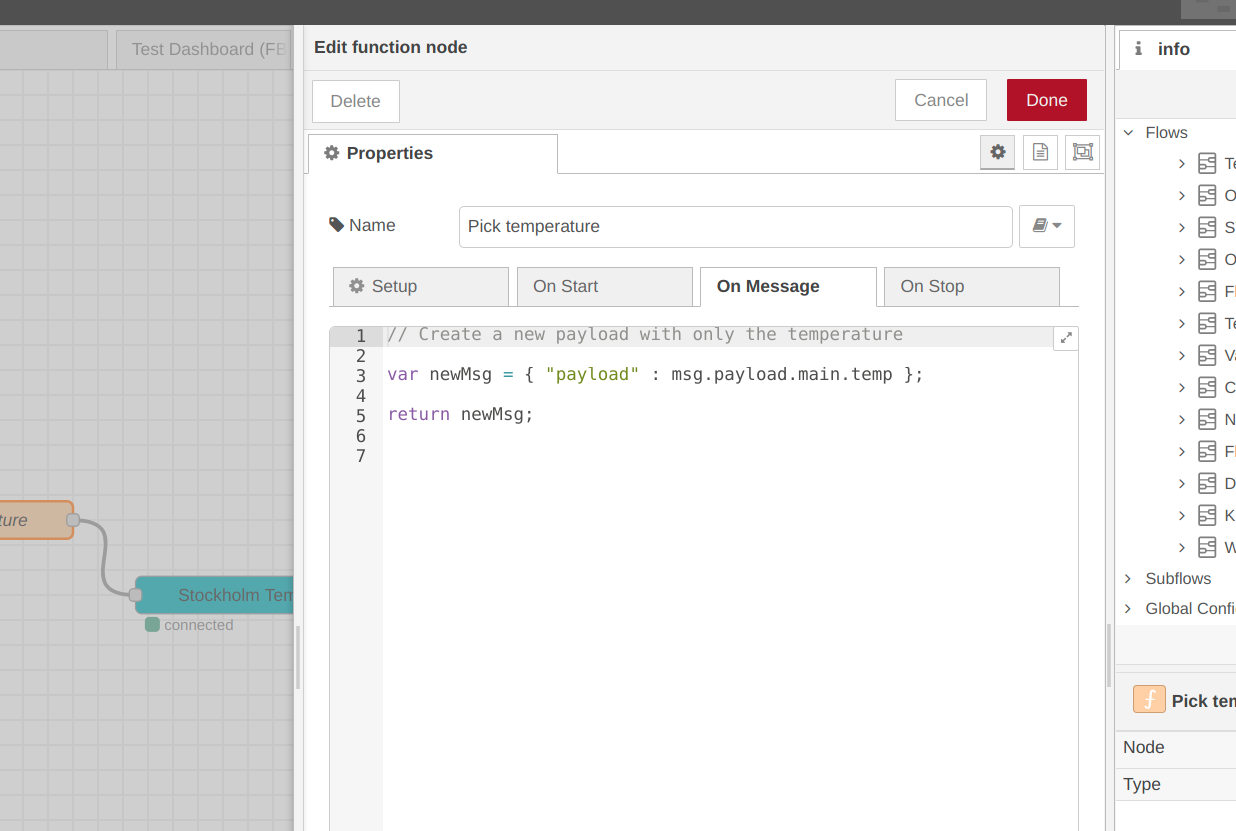
As you can see the temperature value is in msg.payload.main.temp so we have to add a function that builds an object that looks like that. Place a function node at the end of the flow before the debug-node.
Add this code inside the function node.
// Create a new payload with only the temperature

var newMsg = { "payload" : msg.payload.main.temp };

return newMsg;
Create a function in Lynx for the data
We need to create a function for the data in Lynx in order to use it and to present it.
It you do this for only a few functions it is easiest to do it in the web-interface. If you want to create hundreds you should consider using the API and some simple scripting. Here we use the web interface.
Log in and click on "Installations" and open your installation. At the end of the function list there is a tool for creating functions. Choose "Generic Function" and click "Add".
Enter the following:
Device: Leave unselected
Name: Whatever you want, e.g. Temperature Stockholm
Type: temp
Icon: Pick what you like, there is a thermometer
Metadata:
- topic_read:
obj/ow/stockholm/temperature - format:
%.2 °C
Now you should see the data in Lynx and in other integrations with Lynx, e.g. the Grafana dashboard.
Inject the data to Lynx
To get the data into Lynx we use a lynx - out node in Node-RED. First we have to configure it.
- Drag a
lynx - innode to you workspace. - Double click on it to start its configuration dialog.
- Choose
Add new Lynx-serverand click on the pen. - Enter the following:
URL: https://lynx.iotopen.se
Broker: lynx.iotopen.se
API-Key: API_KEY_LYNX
If you have a custom or on-prem installation the values will ofcourse be different.
Then chose you installation and the function you created above.
Here follows some dumps on the configuration.


Now connect everything an you should get an updated temperature in Lynx everytime you press the inject node.
Finally, just change the inject-node to inject the weather at some good interval e.g. every five minutes.
Next steps
Why not add some other data you got with the API Call to Open Weather? The Node-RED flow might be optimized even though it works fine as is.
Have fun!