Node-RED
Node-RED is a great tool for building rules on signals from IoT Open or other platforms. There are a lot of modules and functions that can be applied your IoT Open installation.
Prerequisites
You will need an IoT Open installation with at least two functions in our case these are a motion sensor and a switch.
You also need an API-Key from a user-account having access to the installation. See This guide for details.
You also need a Node-RED installation with the Lynx integration installed. It can be installed from within Node-RED by the menu and "Manage Palette". The name of the nodes are "node-red-contrib-lynx".
Example task
The task to solve is to control lights depending on a sensor value. We have a LoRaWan motion sensor, and a light we control using a Z-wave interface.
The idea
A detection of motion turns the light on and after an amount of time the light turns off. If there are reoccurring motions the time extends so that the light finally turns off after the amount of time after the last motion.
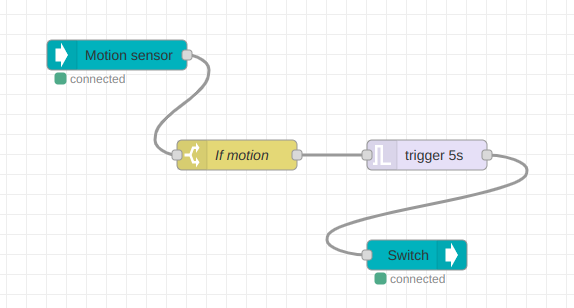
This is implemented in Node-RED with the following nodes.
Lynx in: Get the data from en motion sensor.
Switch: Used to check for motion only.
Trigger: Sets the message to 1 (turn light on) on motion and 0 (turn light off) after an amount of time (we use only 5 seconds in the example for testing).
Lynx out: Control the light.
Here is what the flow will look like when it is done.
Implementation
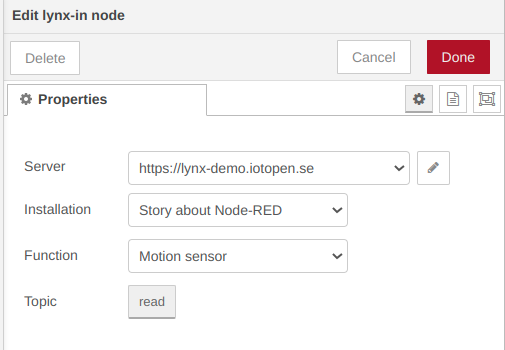
Lynx in
Both Lynx-in and Lynx-out uses a Lynx-server node to save connection properties. Create a new one by clicking on the pen next to "add new lynx-server" in the configuration of the Lynx-in node. There are three things you have to add. Please change these to what suits your installation.
URL: https://openlynx.iotopen.se
Broker: openlynx.iotopen.se
API-Key : <your api key here>
In the configuration of the Lynx-in node, choose the function that controls the flow. In our case the Motion sensor.
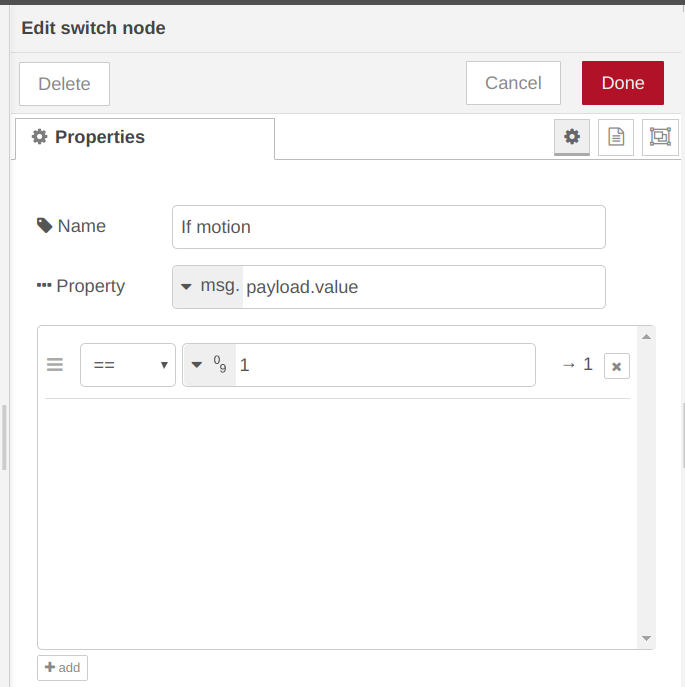
Switch
Since the motion sensor might send other values than motion like motion stop or something else we need to check that the value is corresponding to motion. In our example "1" means motion. Some sensors use 255 instead.
Since the data now is in object-form it is easy to check.
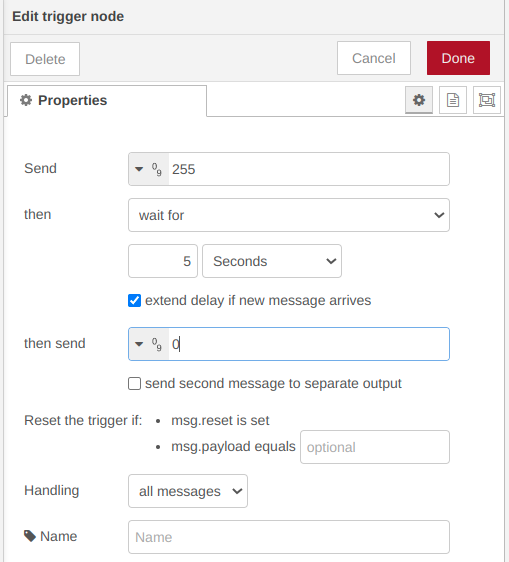
Trigger
The Trigger node is a very powerful node that can be used for lots of things. Here we use it to turn on the light on then after five seconds turn it off. What to send is different on different switch hardware. In this case 255 means on and 0 means off. What to control is determined in the next node.
Lynx out
Similar to Lynx-in but now we choose the switch that will control the lamp or another function that is activated when the input sensor is triggered. Note that a switch might have one topic for read and one for write. Make sure you select the right one.
Test
When testing and observing traffic on MQTT the following messages are sent.
2/obj/lora/647fda00000012ea/motion {"value":1, "timestamp":1582406543}
2/set/obj/zwave/1/switch {"value":255}
2/set/obj/zwave/1/switch {"value":0}
The first line is the motion detected by a lora motion sensor. The second line sent by Node-RED comes immediately after the first one. The light is lit. Then after 5 seconds the third message is sent by Node-RED and the light is turned off.
What happens if there are repeated motions?
2/obj/lora/647fda00000012ea/motion {"value":1, "timestamp":1582406551}
2/set/obj/zwave/1/switch {"value":255}
2/obj/lora/647fda00000012ea/motion {"value":1, "timestamp":1582406552}
2/obj/lora/647fda00000012ea/motion {"value":1, "timestamp":1582406553}
2/obj/lora/647fda00000012ea/motion {"value":1, "timestamp":1582406554}
2/obj/lora/647fda00000012ea/motion {"value":1, "timestamp":1582406555}
2/obj/lora/647fda00000012ea/motion {"value":1, "timestamp":1582406555}
2/obj/lora/647fda00000012ea/motion {"value":1, "timestamp":1582406556}
2/obj/lora/647fda00000012ea/motion {"value":1, "timestamp":1582406557}
2/set/obj/zwave/1/switch {"value":0}
Works like intended. Every motion postpones the turning off of the light by 5s.
Now let's set the delay to something more relevant, for instance 2 minutes.